Tutorials
  |
[SA]Deji's CLEO Tutorial 1
 Jun 7 2009, 01:33 AM Jun 7 2009, 01:33 AM Post #1 | |
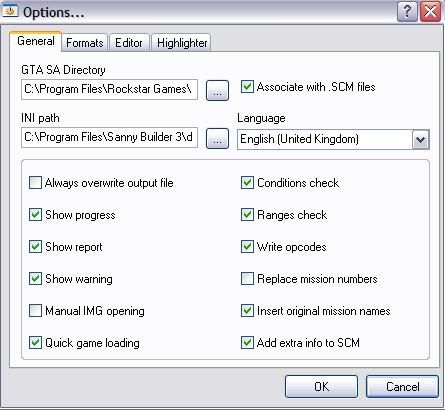
 Coding like a Rockstar! Posts: 1,468 From: ??? Joined: 28-May 09 | Welcome to my CLEO coding tutorial. Made for guys who want to mod main.scm but don't know how. I'm learning myself so I'll try to put it in a learners point of view, which will probably make this easier to follow This tutorial is a work-in-progress, It'll take quite a while to finish as Coding aint the simplest thing on earth, it takes patience, common-sense and imagination. If you haven't got those things... Leave now, go on! If you didn't leave and are sure you can handle this, then you can proceed... Part One: Getting Started First, you will need CLEO. If you don't have the sense to type in 'CLEO San Andreas' in google to find it, then go... Coz I'm not planning on teaching people with no brains that wouldn't even make it past the first section xP - CLEO is a code library that adds new opcodes to San Andreas. What are opcodes? You'll find out later! It also enables a new type of script that supports old save games. Meaning you never have to start a new game when you install a script mod! You will also need Sanny Builder. CLEO is included with it. What is it? Sanny Builder is the most advanced tool for editing main.scm and creating CLEO scripts. Fast, nice and has easy user interface. Why can't we just edit the file with your bog-standard 'Notepad' program like with the SA data files? Because it doesn't decompile scripts... It doesn't put the main.scm into a readable format. It'd come up with loads of garbage. Most tutorials will teach you the origin of main.scm coding and about hexidecimal editing. Where as I wont. At least, not yet. Now, we need to set up Sanny to the right settings! So open up Sanny and press F10 or go to: Tools > Options - And tick accordingly so that your settings are like mine  Once you've got Sanny Builder and CLEO installed and set up, open up the main.scm file in GTA San Andreas\Data\Script folder. You may notice script.img in the same folder. That is just an IMG archive containing more scripts called 'External Scripts' but these can be edited in the main.scm thanks to how Sanny works Wow, alot of text appears when you open the file. ALOT. This is everything in San Andreas. main.scm is the most important file in ways, it manages every level, function and most importantly... It creates the player, CJ. Which you need to play the game, right? By the time you have finished reading my tutorials you should easily be able to tell what this means straight away... CODE :MYTHREAD 0001: wait 2000 ms 00D6: if 8118: not actor $PLAYER_ACTOR dead 004D: jump_if_false @MYTHREAD 0002: jump @MYTHREAD1 :MYTHREAD1 0001: wait 3000 ms 0223: set_actor $PLAYER_ACTOR health_to 0 0002: jump @MYTHREAD If you can guess what it does, well done! If not, read on... Part Two: The Basics So lets explain a few things... I'll start with some of the things that are in that code above... Opcodes are used for every single command. You may notice the 4 digit number in front of the text saying 'wait' - You may also notice that this number (0001:) comes before EVERY 'wait' The opcode tells the game what to do... In fact, the text 'wait' isn't even read by the game when you compile it. Because in the compiled script, there is no text. Thus 'wait' is actually unneeded. But the reason it's there is because Sanny inserts it. The wait command tells the game to stop for whatever amount of ms (milleseconds) you tell it to. CODE 0001: wait 1000 Would make the code wait for a second before reading the next line of code. In the compiled script, I think that line would look more like this... CODE 1 1000 Why? Well '1' is the opcode 0001: but without the extra 0's and the ':' - '1000' is the wait time in milleseconds. It looks more complicated that way doesn't it? That's why we add text until the script is compiled The reason the opcode is needed so much is simple... If the code just said 1000 then the game wouldn't know what it meant. It could be anything, milleseconds, cash, amount of cars... That is why the opcode is needed and is always needed. So opcodes are 4 digit numbers followed by a colon (Which is : if you don't know what one is) and they tell the code what to expect in the line. However, Sanny Builder uses Shortcuts. So if you write 'wait 1000' it will add the opcode itself when the script is compiled. Cause Sanny can read the 'wait 1000' and turn it into "1 1000" but this doesn't work for all the codes. jump tells the game to jump to a certain thread in the script. If it was to say: "jump @MYTHREAD2" then it would jump to the thread that is called ":MYTHREAD2" The opcode for this is 0002 Threads name the section of code. Notice how I didn't use italics as it isn't a command at all which is why it needs no opcode 0002: jump @MYTHREAD would be used to go to :MYTHREAD - Like this... 0002: jump @MYTHREAD {This would make the game jump to...} :MYTHREAD {Here!} IF is a question. Not just in the english language but in main.scm coding too! The opcode for it is "00D6" It is usually used for making sure something has happened. Like this: 00D6: if you read this tutorial jump @MakingYourFirstMod! 004D: jump_if_false @YouSuck That would mean that if you read this tutorial, you will make your first mod. But if you don't read this tutorial... You suck jump_if_false. yes, I used it above. It is always used after an if command. It tells the game where to jump if the "you read this tutorial" isn't true.. So if you didn't read the tutorial, you would jump to whatever the jump_if_false tells you to jump to. Which was :YouSuck above. Variables. Variables are what the game uses to store information, whether it is that of a car or a ped/actor... We often see something like $4561 or 5@ in scripts... Well $4561 is a Global Variable, be careful with using these as they are recognized over the WHOLE GAME! And are converted to random numbers by sanny upon compiling, meaning if it is the same as another Global Variable, the game will encounter glitches or crash. 5@ is a Local Variable. I think these are only tracked over 1 script... Meaning if you used them in another script, they wouldn't collide! These are what you should use most of the time. CODE 0815: put_object 0@ at 20@ 21@ 22@ and_keep_rotation That line is referring to an object that is stored in 0@ and puts it at coordinates that are stored at 20@, 21@ and 22@ There are a maximum of 32 Local Variables... Meaning you can only from 0@ to 32@ and 33@ - 34@ are timers... Which are different and I wont go deep into because I don't even know much about these xP If you are editing a mission, feel free to use 35@ to 1024@ Part Three: Finding and Using Opcodes This can range from easy to hard. Sometimes I can never find what I want easily, sometimes I can... The quickest way to start searching is to type what you want in Sanny and press F1 to search through opcodes. (By the way, typing "I want to create a car" won't work. But typing "car" or "create" will!) But this can be a slow way to find them... Second is the Opcode database in Sanny which is read from the ini file under the Sanny\Data\SA folder. Just press Ctrl + Alt + 2 to open up a window and type what you want to view all the opcodes. This is by far my favourite method. Or you can search for them online! To know what an opcode is gonna do, you need common sense! For example... CODE 07FF: set_car 69@ hydraulics 1 Is pretty obvious, it sets the car that is named 69@ to have hydraulics. I would immediately know that changing the 1 to a 0 would turn hydraulics off and changing 69@ would change to whatever name I gave my vehicle So have common sense!! Part Four: .CS Scripts CS stands for CLEO Script. Since we are learning how to code CLEO, I should go through this. A .cs file doesn't require a new game unlike main.scm mods do... Which is great for the user and the creator in ways... Sanny Builder has all the info on how to create a .cs script in the help files. But here you go... QUOTE (Sanny Builder) There are several ways of making of a CLEO-script being able to work correctly in the game. First: you add a new external script in the source file, compile it, and then extract that script from the file script.img. The extracted file will have the extension .scm, so you only need to change it on the .cs and copy to the folder Ďgame\CLEOí. The second way is easier. Create a new file in Sanny Builder, write the directive $E at the beginning of it, and compile. The compiled file will be the same as that one extracted from the script.img. You only need to change its extension on the .cs and copy to the Ďgame\CLEOí. Finally, the easiest one. Create a new file in Sanny Builder, write the directive $CLEO at the beginning of the file, and compile. The compiled file will be copied into the Ďgame\CLEOí directory and will have a file extension specified by the directive (.cs by default). The CLEO-scripts could be used as missions. The compiling process is the same, but the output file must have the extension .cm (Custom Mission). To start this mission, use the opcode 0A94. Well, you'll see that you can also create custom missions, but that is coming MUCH later... Basically, just put these things at the top of your script... And you'll be fine... CODE {$VERSION 3.1.0027} {$CLEO .cs} By the way, you MUST use 03A4: name_thread 'NAME' when making a CLEO thread, otherwise... You will have weird bugs like me: http://gtag.ipbfree.com/index.php?showtopic=300 Part Five: Understanding Scripts Okay, now time to look at that script... CODE :MYTHREAD 0001: wait 2000 ms 00D6: if 8118: not actor $PLAYER_ACTOR dead 004D: jump_if_false @MYTHREAD 0002: jump @MYTHREAD1 :MYTHREAD1 0001: wait 3000 ms 0223: set_actor $PLAYER_ACTOR health_to 0 0002: jump @MYTHREAD Now, hopefully it looks alot easier to understand now. As you can see, it waits 2 seconds and then checks if the player is dead, if he is, it checks again after 2 seconds... If the player is not dead, it goes onto the next thread, waits 3 seconds and kills the player... Or rather, sets the players health to 0 (Kills the player) xP Simple! It's just something that kills the player whenever hes alive. This is what first got me to understand CLEO coding and hopefully, it should do the same for you! That's all folks! I may clean this up later and part 2 will be coming soon which will get you started with creating things and making them do stuff! -------------------- | CLEO 4.3.22¬†| A?i?a?o?3D | UI SDK |¬†Black Market Mod 1.0.1¬†|¬†GInput¬†0.3¬†|¬†Cheat Keyboard¬†|¬†Tactile Cheat Activation¬†|¬†Stream Ini Extender 0.7¬†|¬†SuperVars¬†|¬†ScrDebug¬†|¬†Vigilante Justice:¬†San Andreas¬†| |
  |
1 User(s) are reading this topic (1 Guests and 0 Anonymous Users)
0 Members:


